How to Apply Rust Oleum Garage Floor Epoxy! If you’re looking to upgrade your garage floor, Rust-Oleum garage floor epoxy is a great option. It’s durable, easy to apply, and relatively inexpensive. In this article, we’ll walk you through the steps of how to apply Rust-Oleum garage floor epoxy.
Introduction: Rust-Oleum Garage Floor Epoxy
Rust-Oleum garage floor epoxy is a two-part system that creates a durable, long-lasting finish for your garage floor. This epoxy is resistant to chemicals, oil, and gasoline, making it the perfect choice for those with an active garage. Rust-Oleum garage floor epoxy is also easy to clean and maintain, ensuring that your garage floor will always look its best.
How to Apply Rust Oleum Garage Floor Epoxy
Here’s how you can do it yourself in just a few simple steps.
What You Need:
If you’re looking to give your garage a makeover, one of the best ways to do it is by applying a fresh coat of Rust-Oleum epoxy. This will not only make your garage look great, but also protect your floor from stains and wear and tear. Here’s what you need to know in order to apply Rust-Oleum epoxy to your garage floor:
First, you’ll need a Rust-Oleum epoxy kit, which can be found at most hardware stores. In addition to the epoxy itself, the kit will also come with a paint roller and paintbrush.
Once you have all of your supplies, the first step is to clean the floor thoroughly.
How to Prepare:
Before you can apply a new coat of epoxy to your garage floor, you need to make sure that the surface is clean and free of any debris. Start by sweeping the floor with a broom and then following up with a power washer. If there are any areas with oil or grease stains, you will need to etch those areas with muriatic acid. Once the floor is clean and dry, you can start applying the epoxy.
How to Apply:
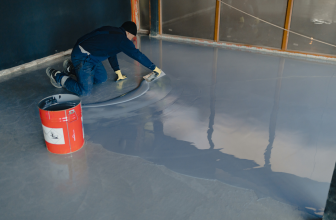
If you’re looking to spruce up your garage with a fresh, new look, consider Rust-Oleum garage floor epoxy. This product is designed to give your floor a tough, durable finish that will resist wear and tear. Here’s how to apply it:
Roll on the first coat of epoxy using a paint roller. Ensure that the first coat has completely dried before adding a second. Once the second coat is dry, you’ll have a tough, long-lasting finish that will stand up to heavy traffic and lots of use.
Tips: Work in Small Sections, and Use a Fan to Speed Up Drying Time
If you’re looking to give your garage floor a fresh coat of epoxy, there are a few things to keep in mind. First, work in small sections so you don’t have to deal with a large, wet area. Second, use a fan to speed up the drying time.
Rust Oleum’s Garage Floor Epoxy is a two-part system that includes a base coat and a top coat. The base coat goes down first and should be allowed to dry for 24 hours before applying the top coat. Once the top coat is applied, you’ll need to wait another 24 hours before walking on the floor.
Conclusion
In conclusion, polishing a concrete basement floor is a simple process that can be completed over a weekend. With the right tools and supplies, any homeowner can achieve professional results. For best results, be sure to follow the manufacturer’s instructions and take care to protect yourself from the dust generated by the polishing process.