How to Prep a Garage Floor for Epoxy Coating

72 / 100

Garage floor preparation is not to be taken lightly. In fact, most contractors agree that concrete floor preparation in a garage is atleast 80% of the battle.

While epoxy garage coatings have proven to stand the test of time when applied properly, it only works well when it adheres and chemically bonds to the concrete. AND, that only happens when the concrete is prepped properly. 

So, if you’re interested in applying an epoxy coating to your garage floor and don’t want to cry when your epoxy starts peeling, get excited about concrete floor prep :), we’ll show you how to prepare the floor correctly in this article, which was prepared by a professional concrete installer.  

So, before we start let’s get realistic. There are two ways to do things usually. The first way, is the right way. If that’s to hard, usually there is a path of least resistance. In this article we’ll show you both, and the decision you make is up to you.

But ofcourse, we’re gonna start with the right way to prep your garage floor for epoxy.

infinity epoxy floors.png

Prepping Your Garage for Epoxy Coating

Any DIY expert will tell you, the best way to get any job right, is by ensuring you properly prepare for it, and applying an epoxy coating to your garage floor is no different. There are a few steps to properly applying the epoxy garage floor coating.

Clear out the garage 

No matter what.. the first and most obvious, MAKE sure your garage floor is clear of all dust and debris. There should be absolutely nothing on the floor. zero.. zilch.. no bikes, no cat hair, no nothing. 

Clean the garage floor

We said it above but we’ll say it again, garage floors get dusty, sweep it spray it, do what you need to do.

We want a blank canvas.

If you can’t remove everything from the garage safely, hire a moving company.

Protect anything valuable from dust

Next.. and this doesn’t have to do with the floor, but you’ll want to protect anything important that you might have on the walls. This is to protect anything valuable from dust (if you’re doing it the right way) you can use tape and plastic sheeting. Just make sure you leave a gap at the bottom so that the coating does not bond with the sheeting. I’ve done that before!

Let the grinding begin!! ( Concrete Grinding Time, Excellent! )

Next, the surface of the concrete floor must be opened up so that the epoxy can bond to the concrete substrate. You can do this with a hand grinder. Professional contractors will use an industrial grinder that weighs a few thousand pounds so they can get through the floor  in an hour, but DIY’ers and even some contractors opt for the hand grinder. It still gets the job done.

The idea here is that a very fine layer of concrete needs to be removed from the surface of the floor. This opens up the concrete so that it becomes porous.

When concrete is porous, epoxy can bond to it.

Get The Proper materials to prep properly (Concrete hand grinder)

Before you get started, make sure you buy a pair of knee pads. Otherwise, let me tell you, this won’t be fun. Knee pads and light goggles make all the difference.

Just go slow in circular motions. You might create some little divots… that’s exactly what you don’t want. Just do your best to go in circular motions and keep the hand grinder level so it doesn’t dig into the concrete. Grind the entire floor. Depending on the size of your garage, it might take anywhere from 2-4 hours to do it correctly.

Make sure the entire surface of the concrete is sanded down and there is no paint, glue, or oil on the floor. When you’re done sweep the entire floor and get all of the dust out. If you got the hand grinding dust shroud it shouldn’t be too bad.

Crack Repair

After you are done fixing the garage floor, use crack repair. This is a cementitious chemical that should be mixed and applied smoothly on the floor. Once it is applied, wait for it to dry. After it dries, you can sand it down again. 

1836241 scaled 1

After all that, now you’re ready to apply you’re epoxy primer coat. Even though garage crack repair is difficult, it’s necessary. If you put in a few hours to do the job properly, then you’ll extend the lifetime of your floor 10x. If that sounds like it’s too difficult for you, here’s the easier softer way..

DIY Garage floor epoxy prep

Honestly, we’re kindof kidding. This solution works well for DIY’ers. It’s a good system to get a really nice floor if you want to do it yourself. This is how rustoleum suggests the concrete be prepared. It’s not that there is anything wrong with this method, but it’s not the way that professional flooring experts prep concrete floors for epoxy.

But, let’s face it, you aren’t doing this for a living and you want a nice floor. 

So if you’re uncomfortable with using a hand grinder to diamond grind the concrete, use the etching method. It does open up the concrete and make it porous so the epoxy will adhers. it just isn’t the same thing as actually taking off the top layer of concrete with a diamond blade. 

For painted floors

If your existing garage floor is painted, you need to de-gloss it by using a sanding pad. Ideally, you want a sanding pad which is on a power tool, as this will be quicker and less work.

  • Sweep the floor to remove dust
  • Scrub the using a bristle broom and floor-cleaner.
  • Thoroughly rinse the floor, and allow to dry for at least 3 hours

For all other bare concrete

  • Sweep the entire garage floor, and if possible, use a vacuum cleaner to remove as much dust as possible. For difficult to reach corners, an at the edges use an old paintbrush.
  • Etch the floor by mixing water and etching solution in a watering can
  • Wet the floor with water and then pour etching solution in a 10ft. x 10ft. foot area furthest from the main garage door.
  • Use a bristle brush to scrub the floor with the etching solution.
  • Continue etching additional areas until all floor has been done.
  • Rinse with water and allow 4 hours for the floor to dry.

At this point, your garage floor is prepared, and it is now time to start mixing your epoxy coating. Follow the instructions on the two solution tins very carefully. 

When the solution is ready, start at the edges using a brush, then proceed to coat the rest of the floor using a roller brush. When completed the coating may need up to 24 hours to dry.

IMG 2956.jpg

What Is Epoxy Flooring for Garages?

Before we make it all sound too easy, we must point out that using an epoxy coating to cover your garage floor isn’t the same as merely painting a bedroom wall. Epoxy is a resinous coating that when mixed together, hardens and bonds to concrete. If you don’t use a 100% solids epoxy and you don’t prep the concrete properly,

There is a chance that the floor will bubble or peel when hot tires drive over it. Let’s be honest though, professional epoxy floor kits are a completely different cost structure and you are talking about spending several thousand dollars instead of several hundred. Some of the kits we review in these articles are meant for the DIY’r and not the professional. If you are looking for a professional floor installation company, we have many recommendations since we have been in the industry for so long. 

Let’s get down to business. Epoxy floor coating is actually a combination of two different compounds, and also must not be confused with an industrial epoxy floor. An epoxy floor is thicker, with a depth of at least 1/16 inch, and tends to be used in industrial and commercial premises.

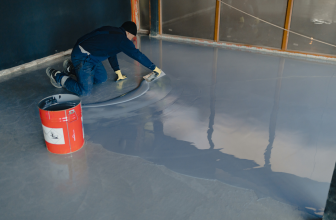
An epoxy coating is created by mixing equal quantities of epoxide resin and a polyamine hardener. When mixed the two components react chemically and this process creates the extremely durable and strong properties of the epoxy coating. In order for it to properly bond to the concrete, the concrete substrate should be prepped and ground and then the epoxy coating should be applied.

Benefits of Epoxy Coating for Garage Floors

We touched on a couple of general benefits of epoxy coating your garage floor, but let’s look at some of those benefits in more detail. The first is the durability of epoxy coating and its ability to withstand some of the more potentially damaging things that can happen in a garage. Epoxy can last as long as the concrete does depending on the type of epoxy that is applied and how the epoxy application is applied. No concrete prep = not very durable.

Impacts, such as dropped tools are less likely to cause any damage, such as a chip in the surface, as are abrasions from equipment being dragged across the floor. Chemical spills are also withstood so neither damage nor staining should occur should anti-freeze, motor oil or gasoline be spilt.

Epoxy coating also leaves a smoother surface, and imperfections such as small ridges, flaws, and cracks underneath will almost be made invisible. The smoother surface also makes it easier to sweep with a soft broom and to mop the floor to keep it clean.

We will be happy to hear your thoughts

Leave a reply

footer-logo

At Floorshields.com, our expert team of flooring researches & writers work to provide thorough & editorially independent content for all of your flooring needs

Navigation

Keep in mind that we may receive commissions when you click our links and make purchases. However, this does not impact our reviews and comparisons. We try our best to keep things fair and balanced, in order to help you make the best choice for you.

As an Amazon Associate, we earn from qualifying purchases.

All Rights Reserved

Made with & Good Floors In Mind
Floorshields
Logo
Enable registration in settings - general
Verified by MonsterInsights