Learn How To Install Metallic Epoxy Floors: A How-To Guide For Dummies!

Let’s face it, metallic epoxy floors look sweet. If you are a flooring contractor or DIY’er and want to learn how to make your floors look like they came from a galaxy far far away, You’re in the right place.
The thing is, metallic epoxy floors are tricky to install. If they weren’t, every mancave in the country would probably have them.
Some epoxy flooring contractors have even shied away from installing them. They’ll say it’s because of the stigma, “metallic epoxy coatings are like a shag carpet, they’ll be gone in a few years” but it’s really because they don’t want to have a floor failure and embarrass themselves. Amiiright?
But don’t worry, we’ve installed thousands of metallic epoxy floors and even included a DIY metallic epoxy garage floor for this article.
Let’s get right into it, starting with the process for how to install metallic epoxy garage coatings.
How To Install Metallic Epoxy Floors
Application Time 8 hours and 18 minutes
How To Install Metallic Epoxy Floors

The infographic on how to install metallic epoxy floors above was a good overview, but we go into more detail here. Like we said above, Metallic epoxy isn’t for the faint of heart so don’t beat yourself up. Using metallic epoxy pigment is more of an art form than a science. You can ask 10 different metallic epoxy coating contractors and get 10 different answers on the right way to do it. We are going to give a broad overview and demystify the installation process.
Step 1: Get Tools And Materials
Metallic epoxy floors require a lot of tools to install if you want to do it right. The three biggest hurdles are surface preparation and, mixing and application, (which each have about 20 steps). Some of the big must-haves are a grinding machine or a hand grinder, easy roller your metallic epoxy kit and 100 solids clear epoxy topcoat as well as buckets, and many other items.
Some people choose not to do a true grind on the concrete and will opt to pressure wash or media blast the concrete, but honestly, you are setting yourself up for failure. If you are going to do that, just use concrete paint and call it a day because the metallic color epoxy won’t truly bond to the concrete substrate unless it is ground down and porous. You can find the full list of materials at the bottom of the article.
Step 2: Choose Metallic Pigments

You choose enough pigment to add proportionately to clear epoxy. For instance, if you have a floor that needs to be done in 3 colors, black, red, and silver, black might be 50% red 30%, and silver 20%. The metallic epoxy pigments are added to a 100% clear epoxy. Basically you can buy epoxy and then add as many metallic pigment colors as you want. Some floors have up to 5 pigments, but we recommend sticking with two or three otherwise it’s going to look like a finger painting.
Step 3: Concrete Surface Preparation
It is imperative to properly prepare the surface through grinding and sanding the concrete surface. This is done by profiling the concrete. Think of how your fingerprints are little ridges on an otherwise relatively smooth surface. By profiling the concrete you are putting tiny ridges that allows the epoxy to “sink its teeth” into the concrete.
Proper concrete preparation ensures a good bond between the epoxy and the concrete surface. Most manufacturers recommend a Concrete Surface Profile (CSP) of at least a two with a three being preferred. A CSP 2 can be achieved by grinding the surface with 16 grit diamond tooling. A CSP 3 is achieved by using a shot blasting machine. Once the surface is properly profiled and completely vacuumed it is ready for epoxy coatings. Take care to remove as much dust as possible.
A good grind and vacuum will make the end result relatively flawless. I say “relatively” because it is nearly impossible to get the floor 100% debris free. Dust will settle onto the floor simply from airflow throughout the room. An 18-inch roller called an EZ Roller will help remove smaller particles that are unseen. It is a sticky roller with perforated sheets similar to a lint roller made for clothes.
Step 4: Install A Concrete Moisture Barrier
Most manufacturers recommend the installation of a pigmented moisture/vapor barrier epoxy floor coating. The moisture barrier acts as your primer coat (first coat). Because Epoxy coatings are not breathable, any moisture that can migrate up and through the surface can cause the epoxy to fail aka bubble or peel.
Moisture barriers come in different formulations based on how many pounds of hydrostatic pressure they can withstand. Most are in the eight to ten-pound range but some advertise that they can withstand up to 25 pounds. If there is any doubt or concern of moisture in the concrete it is 100% recommended to conduct moisture readings in different areas of the concrete. Otherwise, all of your work will be for nothing.
Always follow the mixture ratios set by the manufacturer to mechanically mix the resin with the hardener. Typically part A and part B. Mix for two to three minutes being careful to avoid pulling air down into the mixture. mixing fast helps you avoid air bubbles from getting trapped in the bucket and ending up on the concrete. Once the two parts are mixed, immediately pour the mix onto the floor in thin ribbons. Get to spreading quickly so you have enough time to make it look the way you want before it starts to dry.
Remember to wear spiked shoes when applying an epoxy moisture barrier and use a 3/8” or mohair roller. Back roll the entire surface to ensure even distribution of the product. This is the solid color base coat so it’s not imperative that it is perfect. Just even coverage of the moisture barrier at the manufacturer’s recommended thickness (mil).
Step 5: Clean The Epoxy Moisture Barrier
Once the moisture barrier has dried, use a microfiber mop and acetone to mop up any dust and debris that may have settled on the floor. It is very important that the floor is as clean as possible to prevent unsightly “comets” from appearing in the metallic epoxy application.
Step 6: Mix Metallic Epoxy

In order to have your metallic epoxy coating come out really nice, you have to mix both parts A and B epoxy as well as the metallic pigment. You have to make sure you have enough metallic pigment for the amount of color you want in your metallic floor. For instance, As we stated above if you want a 3 color metallic epoxy floor that is 60% black metallic pigment, 20% red metallic pigment, and 20% silver metallic pigment, you’ll have to have several different pails where you proportionately mix your metallic pigments before laying them down on the floor.
Mechanically mix the metal pigment into part A of the epoxy. Use of a dust mask is recommended because the metallic pigment is very fine can enter the lung. Mix your metallic epoxy part A with part B for 2-3 minutes. Ensure that the metal pigment is completely mixed and there are no clumps. It is advisable to pour this mixture through a strainer to eliminate any unmixed clumps or debris from ending up on the floor.
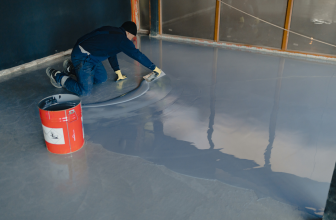
Step 7: Metallic Epoxy Application
Pour the metallic coat onto the base coat in ribbons or small puddles. Pour out what is mixed in the bucket and do not tip the bucket leaving it on the floor. Don’t risk having some part A that sticks to the inside of its container and has not been mixed with the hardening agent part B ending up on the floor and leaving a sticky uncured spot. Put spiked shoes back on and use a Magic Trowel or foam roller to spread.
Different colors of metallic epoxy in smaller quantities can be added as accents to the main metallic epoxy color which has already been placed while different techniques like “figure eights” or “river flows” can be employed to manipulate the metallic epoxy and give the installer the desired effect. Working times for metallic epoxy can range from 25 to 60 minutes. Do not overwork the metallic color or application lines may show due to the epoxy beginning the curing process. the floor in the picture is two metallic colors, red and black pigments with a black moisture barrier.
Step 8: Add Protective Top Coat
Experts refer to this as the money step. It’s the most important step in the metallic epoxy color application process. You’ve come this far, don’t stop now! When the metallic is dry the decision can be made on whether or not to install a protective clear topcoat. Based on your experience in applying a sealing top coat and the limitations of the chosen top coat you may find that the topcoat will have an orange peel finish. If this is not desirable and the floor is in a low traffic area, a high-quality wax may be ideal to preserve the gloss and reflection of the floor. For high traffic areas or areas exposed to sunlight, it is advisable to use a polyaspartic or urethane sealer. Polyaspartic top coating will protect the epoxy from ambering due to UV exposure and offer scratch resistance. Although no system is really scratch proof 100%
Frequently Asked Questions
The first step before applying your epoxy coating, is to prep the concrete floor. It’s important to clean the floor meticulously, then fill any cracks or divots in the floor. Once the crack repair is complete, sand down the surface or acid etch and clean again before application.
Metallic epoxy floors can be expected to cost around $4.50 cents on a DIY project. That ads up to $550 dollars for a 400 square ft garage. There are extra costs like rollers, tarps and many other materials before actually applying the floor coatings. When hiring a contractor the average price is between $7.00 per square foot and $12.50 per square foot.
If you apply a topcoat, metallic epoxy floors are one of the more durable flooring solutions on the market. They are resistant to chemicals, stains cracks and scratches. Themetallic epoxy coating can also stand up to high temperatures and hot tires if applied correctly.
Metallic epoxy coatings can last up to 20+ years. They are a beautiful One Of A Kind Look that is completely unique for your floor. they work well in garages, mancaves and showrooms.
- Must be mixed perfectly
- Floor must be prepped very well and grinded down prior to application
- These floors are a work of art and difficult to replicate
- Many times installed by a very trained professional
The full list of tools and products needed to complete your metallic epoxy project
- Grinding machine with 16 grit tooling, ( If you’re a pro)
- Floor buffer machine with 16 grit tooling affixed to a plate or shot blasting machine
- Optional hand grinding machine to prepare edges and oscillating tool to profile corners
- High CFM (cubic feet per minute) dust collector/vacuum
- Foam E-Z Roller
- Moisture barrier 100 solids epoxy (usually black as it works well with most metallic pigment choices) – Comes with solid epoxy and colors
- 100 solids clear epoxy
- Metallic pigment(s) for the desired color or colors in quantity suitable for square foot coverage of project
- Make sure you get enough moisture barrier epoxy, 100 solids clear epoxy and enough metallic pigment to finish the entire job based on its square footage
- Masking tape to tape off baseboards or walls
- Electric drill with mixing paddle
- Buckets ranging in size from quart to 5 gallon
- Spiked shoes for epoxy
- Magic trowel
- 18” 3/8th size nap or mohair rollers with frame
- Optional foam roller or 3” rollers with frame for desired effects
- Microfiber mop
- Acetone and xylene for cleanups
- Latex gloves
- 5 gallon bucket size paint strainers
- 85 percent clear polyaspartic or urethane/polyurethane for clear coat in quantities suitable for square foot coverage of project
- Dust mask or respirator (if installer is sensitive to VOC (volatile organic compounds)
Please keep in mind that you can get the job done just with the products we linked to. Some of the other products are necessary if you are a contractor and will be doing these projects regularly but are not necessary if you are only doing this once for yourself.
The Bottom Line With Metallic Epoxy
Epoxy floors are durable and beautiful. But, the Installation process and floor prep needs to be perfect or the epoxy will not bond and adhere properly to the concrete substrate. Mixing the pigments proportionately is important as well as the spread rate per square foot. Because of these variables, it’s important for you to be precise, Metallic epoxy applications aren’t for the faint of heart. There are other things to keep in mind like the temperature of the floor when you are applying the epoxy application. If it is below 50 degrees it won’t fair well. Every metallic floor coating is a unique work of art. They can be challenging but when installed following these guidelines you will find success and pride in a job well done.
Our how to install metallic epoxy article was produced in collaboration with Bert Lucas, a professional metallic epoxy floor installation specialist with 15 years of flooring experience.